
Apache HTTP server is one among the most popular web server software. It is an open source software developed by an open community of developers. And it is easily available on a wide variety of operating systems, that of course includes Linux.
Here is another ubuntu guide for Ubuntu users on installing Apache 2. Assuming this to be your first shot at performing the install of Apache 2 on Ubuntu 10.04, I’ve written a very detailed and step by step (lengthiest, I know) guide.
Okay, so installing an Apache server with PHP5 and MySQL support can help you create your own home server for testing your files. That being said, lets get things right off the bat:
1. Quickly Installing Apache2
Entering a simple command in the Terminal will start the installation process. Follow the steps below to install Apache2.
i. Navigate to Applications > Accessories > Terminal to fire up the terminal window.
ii. Enter the following command to start the installation:
sudo apt-get install apache2
It will ask for your password. Enter the password and hit Enter. Further, follow the instructions that appear on the screen.
iii. Once the installation is completed, close the Terminal window. Open your web browser and enter the following URL to test if the installation is successful:
http://localhost/
If successful, you will see the Apache2 placeholder page. (Image below)

Apache’s default Document Root on Ubuntu is /var/www/. Document Root is the directory is designated to hold web pages.
Changing the default Document Root
Apache allows you to change the default document root to any location on your PC. Changing the document root requires you to edit the configuration files. Here’s how you can do it.
i. Choose the location on your PC that you would like to use as the document root. (For ex: /home/<user>/server)
ii. Now, enter the following command :
sudo cp /etc/apache2/sites-available/default /etc/apache2/sites-available/webserver
This command copies the contents of the default configuration file to a new file (webserver).
iii. Edit the new configuration file using gedit.
sudo gedit /etc/apache2/sites-available/webserver
iv. In the configuration file change the Document Root to point to the location you want.
DocumentRoot /home/<user>/server/
v. Also change the Directory to point to the new location.
<Directory /home/<user>/server/>
vi. Save the file. To deactivate the default configuration file and activate the new file enter :
sudo a2dissite default && a2ensite webserver
vii. Restart the Apache HTTP Server for changes to take place.
sudo /etc/init.d/apache2 reload
That’s it! You can now copy your web pages to the specified directory.
2. Installing PHP5
PHP is a widely used scripting language used by a lot of web developers for designing dynamic web pages. Most of the modern web servers support PHP. Follow the given steps to install PHP5.
i. Enter the following command to install PHP5 and Apache PHP5 module :
sudo apt-get install php5 libapache2-mod-php5
ii. Restart Apache2.
sudo /etc/init.d/apache2 reload
To test if PHP5 is working, let’s create a small php file called phpinfo.php. This file gives you useful details of your PHP installation.
i. Create the phpinfo.php file using gedit.
sudo gedit /home/<user>/server/phpinfo.php
ii. Copy the following code into the file and save it.
<?php phpinfo(); ?>
iii. Now, open your web browser and enter the following URL.
http://localhost/phpinfo.php
You will get a web page as shown below.
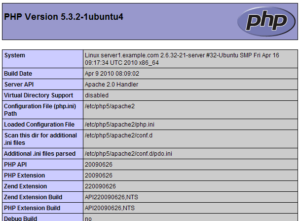
This shows that PHP5 has been successfully installed on your OS.
3. Installing MySQL
MySQL is one among the most secure and reliable database management systems. Many high traffic sites like Google, Flickr, Facebook,etc. use MySQL for data storage and logging of user data. The following are the steps to install MySQL on Ubuntu.
i. Fire up the Terminal and enter the following command:
sudo apt-get install mysql-server mysql-client
During the installation, you will be asked to provide a password for the MySQL “root” user. This password will be used to login to MySQL.
ii. After installing MySQL, you need to configure PHP to use MySQL. Installing the php5-mysql package enables MySQL support in PHP. It enables you to use PHP to connect to MySQL databases.
sudo apt-get install php5-mysql
iii. Installing phpMyAdmin : phpMyAdmin is a web interface for managing your MySQL databases. It can perform various actions such as creating, deleting, modifying databases etc. To install phpMyAdmin enter the following command :
sudo apt-get install phpmyadmin
During the installation use the following options:
Web server to configure automatically: Apache2
Configure database for phpmyadmin with dbconfig-common?: No
iv. To access phpMyAdmin, open your browser and enter the following URL:
http://localhost/phpmyadmin/
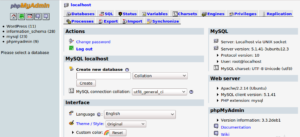
That’s it! Apache2 has been successfully installed on your Ubuntu 10.04. Start testing your web pages on your own home server.
If you are experiencing any problems during installation, do let us know.